PythonAnywhere
- 가입
PythonAnywhere에 GitHub 코드 복사하기
- GitHub에 저장해 놓았을 경우
GitHub 코드 가져오기
PythonAnywhere - Bash 콘솔
$ git clone https://github.com//my-first-blog.git

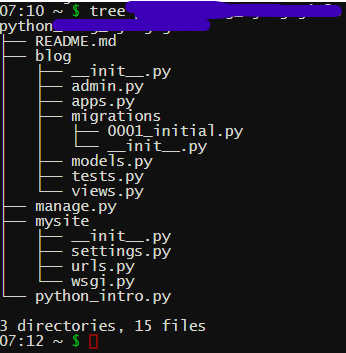
Tree 확인
PythonAnywhere - Bash 콘솔
$ tree my-first-blog
PythonAnywhere 가상환경(virtualenv)
가상환경 생성
PythonAnywhere - Bash console
$ cd my-first-blog
$ virtualenv --python=python3.6 myvenv
$ source myvenv/bin/activate
(myvenv) $ pip install django~=2.0

DB 생성 - 서버 DB 초기화
PythonAnywhere - Bash console
(mvenv) $ python manage.py migrate
(mvenv) $ python manage.py createsuperuser

web app으로 블로그 배포
PythonAnywhere -> Web -> Add a new web app -> manual configuration-> Python 3.6
- 도메인이 생성됨 id.pythonanywhere.com
가상환경 설정
- 서버 앱 변경사항 시 사용하게 됨
경로설정
Virtualenv 섹션에서 가상환경 경로 입력
WSGI 파일 설정
- Django protogol
Code 섹션 -> WSGI configuration file
: 웹 애플리케이션의 위치와 Django 설정 파일명을 알려주는 역할
id_pythonanywhere_com_wsgi.py
import os
import sys

path = '/home/<your-PythonAnywhere-username>/my-first-blog'  # PythonAnywhere 계정으로 바꾸세요.
if path not in sys.path:
    sys.path.append(path)

os.environ['DJANGO_SETTINGS_MODULE'] = 'mysite.settings'

from django.core.wsgi import get_wsgi_application
from django.contrib.staticfiles.handlers import StaticFilesHandler # StaticFileHandler CSS를 다루기 위함
application = StaticFilesHandler(get_wsgi_application())
배포 확인
http://id.pythonanywhere.com/

https://tutorial.djangogirls.org/ko/deploy/
배포하기! · HonKit
Git은 git-scm.com에서 내려받을 수 있습니다. 설치는 쉽답니다. 딱 한 단계만 빼고 기본 설정대로 다음 다음 다음을 계속 눌러주면 쉽게 설치할 수 있어요. 다섯 번째 PATH 환경 설정(Adjusting your PATH en
tutorial.djangogirls.org
'Languages > Python' 카테고리의 다른 글
| [Django] views - Djangogirls (0) | 2020.07.29 |
|---|---|
| [Django] urls - Djangogirls (0) | 2020.07.29 |
| [Django] 관리자 admin - Djangogirls (0) | 2020.07.27 |
| [Django] 블로그 사이트 프로젝트 2, 모델 - Djangogirls (0) | 2020.07.25 |
| [Django] 블로그 사이트 프로젝트 1 - Djangogirls (0) | 2020.07.25 |


